2022.12.07 - [Knowhow] - Fisheye camera model(KB, UCM, DS 모델)
Fisheye camera model(KB, UCM, DS 모델)
Introduction fisheye 카메라는 일반적으로 광각을 넘어서 180도 이상을 촬영하는 경우까지 포함하기 때문에 직관적으로 이해하기가 어렵다. 이미지 sensor는 앞을 보고 있는 평면이기 때문에 물리적으
jseobyun.tistory.com
위 글에서 소개한 3가지 모델을 적용하여 직접 광각 카메라의 캘리브레이션을 수행하고자 할 때 Basalt-mirror 라는 소프트웨어를 사용하면 손 쉽게 할 수 있다.
이전 글의 말미에서 DS 모델을 적용하고자 할 때만 추천을 했지만 코드를 뜯어보니 camera_type을 "kb4", "ucm", "ds" 로 변경만 해주면 3가지 모델 전부로 basalt를 이용해 캘리브레이션 할 수 있다.
하지만 Basalt는 odometry로 더 유명한 코드이고, 카메라가 여러 대 설치된 시스템을 기본으로 하기 때문에 입력 데이터 포맷이 rosbag이어야 하고 복수의 카메라가 존재해야 한다.
이 점이 유일하게 사용하고자 할 때 애를 먹는 부분인데, 본 글에서는 이 부분을 해결하고자 img2rosbag 코드를 공유하고자 한다.
추가적으로 간단하게 사용법도 정리하고자 한다.
1. Basalt 설치
https://github.com/VladyslavUsenko/basalt-mirror
GitHub - VladyslavUsenko/basalt-mirror: Mirror of the Basalt repository. All pull requests and issues should be sent to https://
Mirror of the Basalt repository. All pull requests and issues should be sent to https://gitlab.com/VladyslavUsenko/basalt - GitHub - VladyslavUsenko/basalt-mirror: Mirror of the Basalt repository. ...
github.com
위 링크의 가이드라인을 따르면 Basalt를 설치하는 것은 어렵지 않다. 큰 이슈 없이 명령어 몇 번으로 사용할 수 있으며 GUI가 뜨기 때문에 사용이 아주 쉽다.
2. img2rosbag.py
먼저 캘리브레이션에 사용할 이미지를 다음과 같은 구조로 정리한다.
IMG_ROOT
    |-cam0
    |	|- image_raw
    |           |-000.jpg
    |           |-001.jpg
    |	        |-...
    |-cam1
    |	|- image_raw
    |	        |-000.jpg
    |	        |-001.jpg
    |	        |-...
    |-...
만약 1개의 카메라만 캘리브레이션을 하고자 해도 basalt는 최소 2개의 카메라를 전제로 한다. 따라서 같은 데이터를 복사 붙여넣기 해서라도 2개의 폴더를 만들어 두어야 한다.
import os
import cv2
import rospy
import rosbag
import argparse
from sensor_msgs.msg import Image


# setup the argument list
def parse_config():
    parser = argparse.ArgumentParser(description='Create a ROS bag using the images')
    parser.add_argument('--root', default="YOUR_IMG_ROOT", help="data root")
    args = parser.parse_args()
    return args


def get_img_paths(cam_dir):
    '''Generates a list of files from the directory'''
    image_files = list()
    timestamps = list()
    if os.path.exists(cam_dir):
        for path, names, files in os.walk(cam_dir):
            for f in files:
                if os.path.splitext(f)[1] in ['.bmp', '.png', '.jpg']:
                    image_files.append(os.path.join(path, f))
                    timestamps.append(os.path.splitext(f)[0])
                    # sort by timestamp
    sort_list = sorted(zip(timestamps, image_files))
    image_files = [file[1] for file in sort_list]
    return image_files

def img2msg(id, file_path, cam_name):
    image_np = cv2.imread(file_path, cv2.IMREAD_GRAYSCALE)

    file_name = os.path.splitext(os.path.basename(file_path))[0]
    print(F"INFO : {cam_name}/{file_name} is writed into the bag with sync id {id}")
    dummy_timestamp_value = format(id, "010d") + format(0, '09d')
    timestamp = rospy.Time(secs=int(dummy_timestamp_value[0:-9]), nsecs=int(dummy_timestamp_value[-9:]))

    rosimage = Image()
    rosimage.header.stamp = timestamp
    rosimage.header.frame_id = cam_name
    rosimage.height = image_np.shape[0]
    rosimage.width = image_np.shape[1]
    rosimage.step = rosimage.width  # only with mono8! (step = width * byteperpixel * numChannels)
    rosimage.encoding = "mono8"
    rosimage.data = image_np.tobytes()

    return rosimage, timestamp


if __name__ == "__main__":

    args = parse_config()

    bag = rosbag.Bag(os.path.join(args.root, "data.bag"), 'w')

    # write images
    dir_names = os.listdir(args.root)
    cam_dirs = sorted([os.path.join(args.root, dir_name, "image_raw") for dir_name in dir_names if dir_name.startswith("cam")])

    for cam_dir in cam_dirs:
        img_paths = get_img_paths(cam_dir)
        for id, img_path in enumerate(img_paths):
            image_msg, timestamp = img2msg(id, img_path, cam_dir)
            bag.write("/{0}/image_raw".format(cam_dir), image_msg, timestamp)


    bag.close()
위 코드를 실행하면 root 폴더에 data.bag 형태로 파일이 생성된다. 이를 입력으로 사용하면 된다.
3. apriltag grid 준비
basalt는 정해진 형태의 마커 보드만을 사용하도록 규정되어 있다. 그래서 제공하는 디자인의 보드만 사용해야 한다.
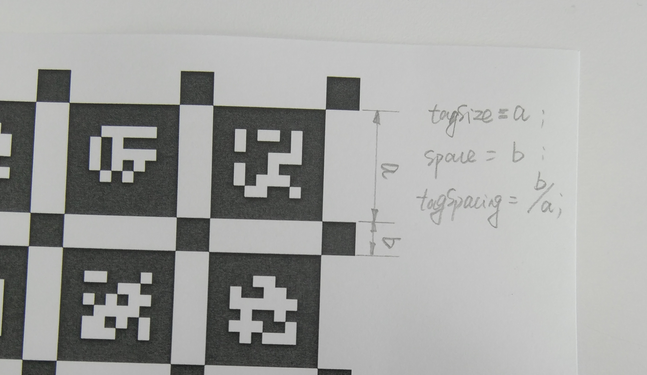
제공되는 디자인은 6x6 형태로 apriltag가 잔뜩 그려져있는 모습인데 이 보드의 규격이 어떤지 json 파일로 작성해서 같이 입력으로 넣어줘야 한다.
basalt github에서 직접 찾을 순 없어서 옆동네 알고리즘 kalibr과 같은 보드를 사용하는 것을 보고 kalibr github에서 가져왔다.
실제로 출력했을 때 규격을 정확히 아는 것이 중요한데 A0로 출력했을 때 정해진 크기로 나오도록 만든 이미지와 그 때의 규격이다.
만약 A0로 출력해서 쓰고자 하면 위 파일을 그대로 쓰면 되고 아니라면 출력한 뒤에 자로 재든 뭐로 재든 json파일 내 "tagSize"를 mm scale로 기록하면 된다. 다른 겂은 건들 필요가 없다.
json 안에 있는 값들이 무엇을 의미하는지 궁금하면 아래 그림을 보면 된다.
3. Basalt 사용
basalt_calibrate --dataset-path ./data.bag \
                 --dataset-type bag \
                 --aprilgrid ./aprilgrid_6x6.json \
                 --result-path ./result/ \
                 --cam-types ds ds
위 명령어 예시와 같이 사용도 간단한데 앞서 만든 bag파일과 json 파일 경로 이외에는 수정할게 딱히 없다.
camera model을 변경하고 싶을 경우 kb4, ucm, ds로 변경하면 되겠다.
마지막에 "ds ds"로 N 번 들어간 이유는 basalt는 multi camera를 지원하는데 그래서 각 카메라마다 타입을 지정해주는 것이다.
위 예시는 카메라가 2대일 때라서 "ds ds"이다. 3대라면 "ds ds ds", "kb4 kb4 kb4", "ucm ucm ucm" 따위가 될 것이다.
이후에는 GUI 상의 버튼을 누르기만 하면 된다. 끝.
'Knowhow > Vision' 카테고리의 다른 글
| Disparity generation (1) | 2023.03.08 |
|---|---|
| Tensorboard를 이용한 pb 파일 시각화 (0) | 2023.02.03 |
| Theseus tutorial : simple pose estimation (0) | 2022.11.24 |
| COLMAP[CLI] SfM/MVS with known camera parameters and poses (0) | 2022.07.14 |
| COLMAP write txt files in python (0) | 2022.07.13 |