1. django는 프레임워크 개념이기 때문에 일반적으로 project를 직접 만들고 하나하나 python script를 작성할 필요없이 명령어로 project를 생성할 수 있다. 이는 framework project가 되겠다.
django-admin startprojeect PROJECT_NAME1-1. 위 1. 방식으로 만드는 것은 튜토리얼 차원에서 좋고, 나중에 다른 사람과 협업을 고려하여 확장성이 좋게 구현할 때는 좋지 않는 초기 설정 방식이다.
mkdir PROJECT_NAME
cd PROJECT_NAME
git init
git remote ~~~

pipenv --three
pipenv shell
pipenv install Django

django-admin startproject config
'''
pull out
from
PROJECT_NAME/config/config and PROJECT_NAME/config/manage.py
to
PROJECT_NAME/config and PROJECT_NAME/manage.py
'''
2. vscode에서 작업할 때, linting flake8과 formatter black을 사용해서 python 코드가 PEP8 규칙에 맞추어 정리되도록 설정해주면 좋다. 단순히 코드가 깔끔해지는 것 외에 나중에 협업할 때 도움이 된다. 기본 세팅으로 하는 것을 추천함.
pipenv install black --dev --pre
pipenv install flake8 --dev
vscode에서 띄워주는 알림을 통해 설치를 하거나, 위 명령어를 통해 설치를 해준 뒤, Manage (화면 좌측 하단 톱니바퀴 아이콘) -> Settings에 들어간다. 이후 default formatter 검색 -> Default Formatter를 Black Formatter로 지정. format on save 검색 -> 체크박스 체크. 해주면 설정이 끝난다. 설정이 제대로 끝났다면 저장할 때마다 코드가 자동으로 정리되는 것을 볼 수 있다.
3. migration은 장고와 데이터베이스를 연동시켜주는 작업으로 생각하면 편함. 장고에서 다루게 될 데이터의 형태나 유형이 바뀌었을 때, migration을 생성하고 migrate함으로써 장고가 변형된 데이터를 인식하고 자동으로 다룰 수 있도록 해주는 것이다. 즉, model을 변경했을 때, 주로 필요한/사용할 개념이다.
4. 장고 프로젝트는 어플리케이션의 집합임. 어플리케이션은 기능 별 하나의 폴더(function의 집합)라고 생각하면 됨. 어플리케이션은 작은 단위로 구성해서 시작하는 것이 좋음. 너무 큰 단위로 모든 기능을 다 포함하는 어플리케이션을 만들면 유지/보수가 너무 힘들어짐. 1을 따르지 않고 1.1 방식으로 만들어서 관리하는 것도 같은 맥락.
기존의 INSTALLED_APPS 밑에 줄줄이 달려있던 형태에서 아래와 같이 구분하여 관리하는 것이 좋음.
DJANGO_APPS = [
    "django.contrib.admin",
    "django.contrib.auth",
    "django.contrib.contenttypes",
    "django.contrib.sessions",
    "django.contrib.messages",
    "django.contrib.staticfiles",
]

PROJECT_APPS = [
    "users.apps.UsersConfig",
]

INSTALLED_APPS = DJANGO_APPS + PROJECT_APPS
5. 장고는 기본적으로 Users app을 제공함. 작성하지 않아도 User 등록에 필요한 내용을 담은 Users app 이 있음. 하지만 대부분의 경우에는 User가 갖고 있어야 하는 정보가 다양하기 때문에 더 많은 정보를 추가해서 새로 만든다. (상속받아 만듦)
django-admin startapp users

### config/settings.py

AUTH_USER_MODEL = "users.User"
INSTALLED_APPS += ["users.apps.UsersConfig"]

### users/models.py

from django.contrib.auth.models import AbstractUser
from django.db import models

class User(AbstractUser):
	pass
2. MVT 개발 패턴을 갖고 있음. Model - View - Template.
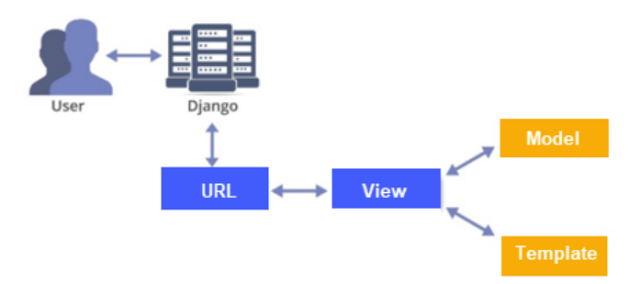
Model : database와 편리하게 통신하게 해주는 도구. django에서 database write/read 등을 편리하게 해주는 부분.
View : user와 server 간에 오고 가는 과정을 도와주는 도구.
Template : UI처럼 실제로 user가 보는 front-end를 다루는 도구. 사실 상 html/css.
3. django는 url을 기반으로 어디서 어디로 라우팅되는지 알기 때문에 main directory/urls.py 뿐만 아니라 생성한 각각의 app directory 하위에도 urls.py라는 script를 만들어, 어디로 흘러들어가야 할 지 함수 수준까지 연결을 해주어야 한다.
### MAIN_DIR/urls.py
from django.contrib import admin
from django.urls import path, include

urlpatterns = [
    path('admin/', admin.site.urls),
    path('account/', include("account_app.urls"))


### APP_DIR/urls.py
from django.urls import path
from account_app.views import hello_world

app_name = "account_app"
urlpatterns = [
    path("hello_world/", hello_world, name="hello_world")
]
4. django에서 생성하는 app 하나를 실행해준 뒤, server를 실행시키는 식으로 사용한다.
python manage.py startapp APP_NAME
...
python manage.py migrate
python manage.py runserver
5. django로 만든 서비스를 배포하기 전, MAIN_DIR/settings.py 내에 있는 SECRET_KEY를 숨겨야 한다.. 특히 git으로 관리할 때 노출되기 쉬운데 script에 직접 기록하지 않고 외부에 파일로 SECRET_KEY를 두고 불러오는 식으로 적는게 편하다. 많은 수요가 있는 기능이기 때문에 django-environ으로 제공됨.
pip install django-environ

### MANI_DIR/settings.py
import os
import environ
from pathlib import Path

env = environ.Env(
    DEBUG=(bool, False)
)

BASE_DIR = Path(__file__).resolve().parent.parent
environ.Env.read_env(
    env_file= os.path.join(BASE_DIR, '.env'),
)
SECRET_KEY = env('SECRET_KEY')


### PROJECT_DIR/.env
DEBUG=on
SECRET_KEY=your_secret_key
DATABASE_URL=psql://user:un-githubbedpassword@127.0.0.1:8458/database
SQLITE_URL=sqlite:///my-local-sqlite.db
CACHE_URL=memcache://127.0.0.1:11211,127.0.0.1:11212,127.0.0.1:11213
REDIS_URL=rediscache://127.0.0.1:6379/1?client_class=django_redis.client.DefaultClient&password=ungithubbed-secret
6. template 파일들 (HTML/CSS 등) 은 PROJECT_DIR/templates를 만들어 따로 관리하는게 용이하다. django가 templates을 인식하도록 경로 설정해주어야 되는데 directory 단위로 받기 때문이다.
PROJECT_DIR
   |--MAIN_DIR
   |--APP0_DIR
   |--APP1_DIR
   |--...
   |--templates
          |--base.html
          |--...

### MAIN_DIR/settings.py


TEMPLATES = [
    {
        'BACKEND': 'django.template.backends.django.DjangoTemplates',
        'DIRS': [os.path.join(BASE_DIR, 'templates')],
        'APP_DIRS': True,
        'OPTIONS': {
            'context_processors': [
                'django.template.context_processors.debug',
                'django.template.context_processors.request',
                'django.contrib.auth.context_processors.auth',
                'django.contrib.messages.context_processors.messages',
            ],
        },
    },
]
7. django에서 디자인을 할 때는 html에 나이브하게 전부 적는 식으로 하지 않는다. factoring 차원에서 공통적인 부분은 따로, app에서만 쓰일 것은 app 하위에 따로 나누는 식으로 작성한다. 구분된 위치에 구분된 형태로 작성된 각각의 html 파일을 extend와 include 구문을 사용하여 본문 html에 넣어주는 식으로 사용한다.
app 하위에 따로 나눌 때, 굳이 templates 폴더 아래 app 이름과 동일한 폴더를 하나 더 만드는 이유는, django는 app을 등록을 하면 app하위 templates 폴더를 MAIN_DIR/settings.py에 등록하지 않아도 자동으로 등록을 하는데 이렇게 되면 어느 위치(메인, app 하위)의 templates 폴더 내에 있는지 코드만 보고는 알 수 없다. 가독성을 높이기 위해 코드 상에 이름이 한 번 더 표시되게 만들 기 위해서 굳이 만드는 것이다. (선택임)
- include 구문
PROJECT_DIR
   |--MAIN_DIR
   |--APP0_DIR
   |--APP1_DIR
   |--...
   |--templates
          |--base.html
          |--header.html

 ###templates/base.html
 <!DOCTYPE html>
<html lang="en">

{% include 'head.html' %}

<body>
    {% include 'header.html' %}
</body>
</html>

###templates.header.html
<div style="height: 10rem; background-color: #38df81; broder-radius: 1rem; margin: 2rem"> </div>
- extends 구문
PROJECT_DIR
   |--MAIN_DIR
   |--APP0_DIR
         |--templates
               |--APP0_DIR  # for clear path expression in views.py
                     |--hello_world.html
   |--APP1_DIR
   |--...
   |--templates
          |--base.html
          |--header.html

 ### templates/base.html
 <!DOCTYPE html>
<html lang="en">

{% include 'head.html' %}

<body>

    {% block content %}
    {% endblock %}

</body>
</html>

###APP0_DIR/templates/APP0_DIR/hello_world.html
{% extends 'base.html' %}

{% block content %}
<div style="height: 20rem; background-color: #38df81; broder-radius: 1rem; margin: 2rem"> </div>
{% endblock %}

###APP0_DIR/views.py
from django.shortcuts import render

def hello_world(request):
    return render(request, 'account_app/base.html')
8. css 파일이나 사용될 이미지 파일의 경우, static 파일로 분류되어 따로 관리를 한다. 보통 디렉토리를 따로 만들어 모아두는데 그 경로는 MAIN_DIR/settings.py에 기록해주어야 인식된다.
PROJECT_DIR
   |--MAIN_DIR
   |--APP0_DIR
   |     |--static
   |           |--app0.css
   |--...
   |--templates
   |--static
          |--base.css

 ### MAIN_DIR/settings.py
 STATIC_URL = 'static/'

STATIC_ROOT = os.path.join(BASE_DIR, 'staticfiles')

STATICFILES_DIRS = [
    BASE_DIR / "static",
]

### each html files
{% load static %}

...
9. models.py 내에 작성하는 내용은 db.sqlite3에 저장되는 형태. 저장되는 데이터는 클래스로 작성해서 정리하는 방식을 사용한다.
class 가 데이터 차원에서 row(name), class 안의 variable들이 column(attribute) 형태라고 이해하면 된다.
### APP0_DIR/models.py
from django.db import models

class HelloWorld(models.Model):
    text = models.CharField(max_length=255, null=True)

### APP0_DIR/views.py
def hello_world(request):
	hw = HelloWorld(
    hw.text = "test"
    hw.save() # hw object to db

    hw_ = HelloWorld.objects.all()
10. views.py 에서 html 파일로 내용을 넘겨줄 수 있다. 주로 model에서 데이터를 읽어 html까지 받아서 넘겨주는 형태가 많다. 아래와 같이 render 기능 내에 context를 이용해서 넘겨주고, html에서 같은 이름으로 받아 사용하는 식.
추가적으로 views.py에서 넘겨주는 인자가 단순 scalr, string이 아닐 경우가 빈번하기 때문에 html 내에서 python 구문을 사용할 수 있다. 형태는 {% %}로 원하는 python 구문을 열고 내용을 작성한뒤 {% endif, endfor %}와 같이 닫아주고 사용하면 된다.
### APP0_DIR/views.py
def hello_world(request):
    hello_world_list = HelloWorld.objects.all()
    return render(request, 'account_app/hello_world.html', context={'hello_world_list': hello_world_list})

### APP0_DIR/templates/account_app/hello_world.html
{% extends 'base.html' %}
{% block content %}
<div>
    {% for hello_world in hello_world_list %}
        <h2>{{hello_world.text}}</h2>
    {% endfor %}
</div>
{% endblock %}
11. django에서 사용하는 path는 총 3가지 형태로 있는 듯 하다. 헷갈리니 웬만하면 다 맞춰서 쓰자...
- url 단위 : 페이지 간 통신을 기본으로 할 때는 urls.py 에서 지정한 이름을 사용해서 입력을 해준다.
### MAIN_DIR/urls.py
from django.contrib import admin
from django.urls import path, include

urlpatterns = [
    path('admin/', admin.site.urls),
    path('account/', include("account_app.urls"))
]

### APP0_DIR/templates/APP0_DIR/hello_world.html

<form action="/account/hello_world/" method="POST">
    {% csrf_token %} # essential for post method
    <input type="text" name="hello_world_input">
</form>- name 단위 : 사전에 지정한 name의 조합으로 path를 표기. 주로 reverse()와 같은 django 내장 함수에서 주로 사용하는 듯.
###APP_DIR/urls.py
app_name = "account_app"

urlpatterns = [
    path("hello_world/", hello_world, name="hello_world_name"),
]

###APP_DIR/views.py
HttpResponseRedirect(reverse('account_app:hello_world_name'))- 실제 파일 경로 단위 : 실제 파일의 경로 그대로 사용.
render(request, 'account_app/hello_world.html', context={'hello_world_list': hello_world_list})'Knowhow > Others' 카테고리의 다른 글
| [ROS2 Foxy Tutorial 한글 번역] 2. Using turtlesim and rqt (0) | 2023.01.31 |
|---|---|
| [ROS2 Foxy Tutorial 한글 번역] 1. Configuring environment (0) | 2023.01.31 |
| Javascript tips (0) | 2022.06.21 |
| CSS tips 2 (0) | 2022.06.20 |
| CSS tips 1 (0) | 2022.06.19 |