여러 카메라 간 상대 자세가 정확한지 판별하는 방법 중 하나로 Epipolar line을 확인하는 방법이 있다.
카메라 자세들이 정확하다면 한 카메라 이미지에서 특징점 하나를 찍었을 때 다른 카메라 이미지에서 그려지는 epipolar line은 같은 특징점을 지나가야 한다.
예를 들어 카메라 0번과 1번를 고려할 때, 카메라 0번 이미지에서 서랍 모서리를 찍었다면 카메라 1번 이미지에 그려지는 epipolar line은 같은 서랍 모서리 위를 지나가야 한다.
이 방법은 카메라 자세 정확성을 평가할 GT가 없을 때 정성적으로 평가할 수 있는 방법 중 가장 직관적이고 정확하다.
이 글에서는 위와 같은 목적으로 epipolar line을 그려보고 싶을 때 활용할 수 있는 Visualizer 코드를 기록해두고자 한다.
epipolar geometry가 어려운 것은 아니지만 essential matrix, fundamental matrix, point to line, line to point 같은 기억하기 어려운 것들을 다 찾아봐야 하고 이를 시각화까지 하기 위해선 구현적으로도 귀찮은 것이 많다.
반복적으로 사용하는 코드임에도 매번 heuristic하게 구현하는 것이 불편하여 class 화해서 정리했다.
코드는 아래와 같다.
### epipolar geometry visualization

class EpipolarVisualizer():
    def __init__(self, K0, K1, T01):
        self.K0 = K0
        self.K1 = K1
        self.T01 = T01
        self.E = self.get_essential_matrix(self.T01)
        self.F = self.get_fundamental_matrix(self.E, self.K0, self.K1)

    def get_essential_matrix(self, T01, normalize_scale=True):
        R = T01[:3, :3]
        t = T01[:3, -1]
        tx = np.array([[0, -t[2], t[1]],
                       [t[2], 0, -t[0]],
                       [-t[1], t[0], 0]], dtype=np.float32)
        E = np.dot(tx, R)
        if normalize_scale:
            E = E / E[2, 2]
        return E

    def get_fundamental_matrix(self, E, K0, K1):
        F = np.matmul(np.matmul(np.linalg.inv(K1.transpose(1, 0)), E), np.linalg.inv(K0))
        return F

    def get_epipolar_line(self, x_left, x_right):
        if x_right is None:
            line_left = None
        else:
            line_left = cv2.computeCorrespondEpilines(x_right.reshape(-1, 1, 2), 2, self.F)
            line_left = line_left.reshape(-1, 3)

        if x_left is None:
            line_right = None
        else:
            line_right = cv2.computeCorrespondEpilines(x_left.reshape(-1, 1, 2), 1, self.F)
            line_right = line_right.reshape(-1, 3)

        return line_left, line_right

    def vis_epipolar_line(self, img, lines):
        img_h, img_w = np.shape(img)[:2]
        random_color = np.random.randint(0, 255, 3, dtype=np.uint8)
        for line in lines:
            A, B, C = line  # Ax+By+C =0
            x0, y0 = map(int, [0, -(C + A * 0) / B])
            x1, y1 = map(int, [img_w, -(C + A * (img_w)) / B])
            cv2.line(img, (x0, y0), (x1, y1), random_color.tolist(), 1)
        return img

    def draw_right_line(self, limg_raw, rimg_raw):
        limg = limg_raw.copy()
        rimg = rimg_raw.copy()
        img_h, img_w = np.shape(limg)[:2]
        def limg_click_event(event, x, y, flags, params):
            if event == cv2.EVENT_LBUTTONDOWN:
                print(f'({x},{y})')

                # put coordinates as text on the image
                cv2.putText(limg, f'({x},{y})', (x, y), cv2.FONT_HERSHEY_SIMPLEX, 1, (0, 0, 255), 2)

                # draw point on the image
                cv2.circle(limg, (x, y), 3, (0, 255, 255), -1)
                pt_left = np.array([[x, y]])
                _, line_right = self.get_epipolar_line(pt_left, None)

                random_color = np.random.randint(0, 255, 3, dtype=np.uint8)
                A, B, C = line_right[0]  # Ax+By+C =0
                x0, y0 = map(int, [0, -(C + A * 0) / B])
                x1, y1 = map(int, [img_w, -(C + A * (img_w)) / B])
                cv2.line(rimg, (x0, y0), (x1, y1), random_color.tolist(), 1)

        cv2.namedWindow('left')
        cv2.setMouseCallback('left', limg_click_event)

        # display the image
        while True:
            cv2.imshow('left', limg)
            cv2.imshow('right', rimg)

            k = cv2.waitKey(1) & 0xFF
            if k == 27:
                break
        cv2.destroyWindow("left")

    def draw_left_line(self, limg_raw, rimg_raw):
        limg = limg_raw.copy()
        rimg = rimg_raw.copy()
        img_h, img_w = np.shape(limg)[:2]

        def rimg_click_event(event, x, y, flags, params):
            if event == cv2.EVENT_LBUTTONDOWN:
                print(f'({x},{y})')

                # put coordinates as text on the image
                cv2.putText(rimg, f'({x},{y})', (x, y), cv2.FONT_HERSHEY_SIMPLEX, 1, (0, 0, 255), 2)

                # draw point on the image
                cv2.circle(rimg, (x, y), 3, (0, 255, 255), -1)
                pt_left = np.array([[x, y]])
                line_left, _ = self.get_epipolar_line(None, pt_left)

                random_color = np.random.randint(0, 255, 3, dtype=np.uint8)
                A, B, C = line_left[0]  # Ax+By+C =0
                x0, y0 = map(int, [0, -(C + A * 0) / B])
                x1, y1 = map(int, [img_w, -(C + A * (img_w)) / B])
                cv2.line(limg, (x0, y0), (x1, y1), random_color.tolist(), 1)

        cv2.namedWindow('right')
        cv2.setMouseCallback('right', rimg_click_event)

        # display the image
        while True:
            cv2.imshow('left', limg)
            cv2.imshow('right', rimg)

            k = cv2.waitKey(1) & 0xFF
            if k == 27:
                break
        cv2.destroyWindow("right")
먼저, class 초기화에 필요한 값은 카메라 0번과 카메라 1번의 intrinsic parameters, K0과 K1 그리고 둘 간의 relative transformation matrix, T01이다.
K0, K1은 3x3 형태의 fx, fy, cx, cy로 채워져있는 matrix이며 distortion은 고려하지 않는다. (만약 distortion을 반영해서 확인하고 싶다면 이미지를 undistort해서 사용하는 것을 추천한다.)
T01은 카메라 1번 좌표계를 카메라 0번 좌표계로 옮겨주는 transformation matrix다. T01의 notation이 의미하는 바가 뭔지 모르겠다면 이전 글 2022.07.13 - [Knowhow] - 3D transformation(R, t) matrix notation 을 참고하면 된다.
그 외에 숙지해야 할 내용은 없고 다음과 같이 사용하면 된다.
### verification
epi_vis = EpipolarVisualizer(K0, K1, T01)

limg = np.zeros([1080, 1920, 3])
rimg = np.zeros([1080, 1920, 3])
epi_vis.draw_right_line(limg, rimg)
epi_vis.draw_left_line(limg, rimg)
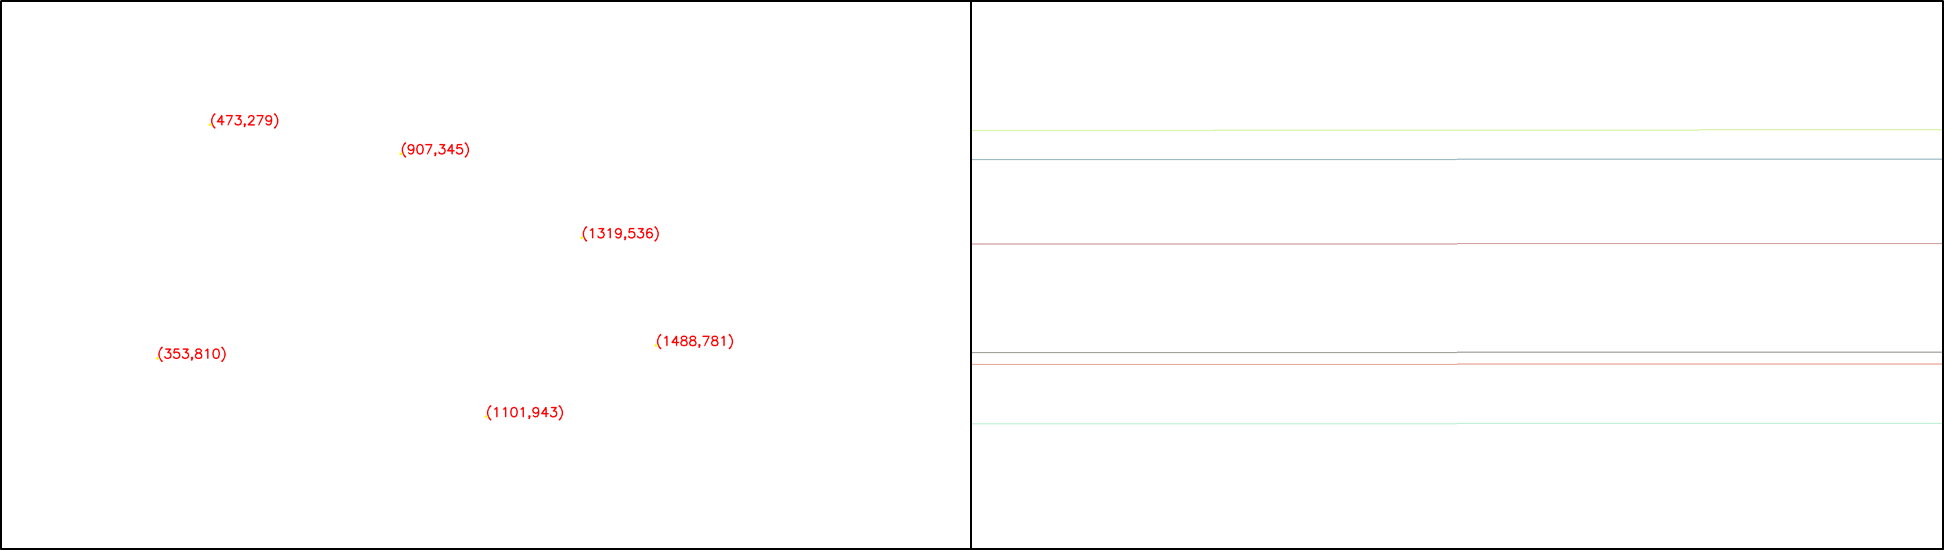
draw_right_line() 함수는 left image에 point를 찍고 right image에 line이 그려지도록 하고 싶을 때 쓰면 된다. 그림으로 보면 다음과 같다.
반대로 draw_left_line() 함수는 right image에 point를 찍고 left image에 line이 그려지도록 하고 싶을 때 쓰면 된다. 역시 그림으로 보면 다음과 같다.

실시간으로 결과를 보는 것이 디버깅할 때 훨씬 사용성이 좋아서 interactivate한 형태로 구현했다. 충분히 point를 찍어본 이후에는 ESC로 종료하면 된다.
'Knowhow > Vision' 카테고리의 다른 글
| 이미지 회전에 맞추어 intrinsic/extrinsic calibration 값 회전시키기 (0) | 2023.08.17 |
|---|---|
| Torch를 이용한 matrix inverse(+속도를 빠르게 만들 수 있는 경우) (0) | 2023.05.18 |
| Open3d manual registration (손으로 point cloud 정합하기) (0) | 2023.03.20 |
| Open3d RGB/Depth image rendering 2 (0) | 2023.03.20 |
| Stereo image rectification (0) | 2023.03.16 |